BMW INPA User Manual: Capacities + How to Use
INPA, is BMW Factory-Level Diagnostic Software included in BMW Standard Tools. It is very powerful, but many/ Most ALL versions I have seen, are in German with LITTLE Translation to English, other than Menus.
TL;DNR Types: LOOK at the attached INPA Screens FIRST before you dismiss.
1. F6, F1, F4 VANOS Activation, En
2. F9, F5 Adjust Idle Speed, En
3. F9, F5, F6 Set RPM Below 2K, En
Specific steps to save & attach INPA Screens are described in attached in the last paragraph (INPA Tutorial Quickstart (Functional Jobs examples). Generally, N51 & N52 Engines use either MSV70 or MSV80 (2007 & Later) DME Variants; N54 Engine uses mostly MSD80 DME Variant, and Later N55 Engine used MEVD17x Variant. To connect with ANY module, you need to know the VARIANT to make proper selection from the Right-hand Listbox.
II. Change Idle Speed Setpoint: DME > F9 > F5 Idle Speed Adjustment:
Some Functions or Activations, such as VANOS Activation described below, require a certain Idle Speed. Also, you may want to reset your idle speed (Setpoint or Target Speed) if you find your warm engine idle too High/too Low. With INPA, it's so simple, even I can do it.
A. Open DME > F9 System Diagnosis > F5 Increase Idle Speed:
When you press/click that Menu Selection sequence you should see the First Screen attached Below, which simply shows the current ACTUAL RPM, and the Setpoint or Requested speed: 664 & 660 RPM respectively in my case. This screen as opened allows you to simply OBSERVE or view current setpoint & Actual Idle Speed (Live Data), BUT if you see the Submenu choices you can click on in the INPA "Taskbar", you see you can add or subtract in increments of 10 or 100 RPM by simply clicking the buttons. OR, you can select F6 Auswahl (Selection) as described below.
B. Enter Specific Desired RPM: DME > F9 > F5 > F6 Auswahl "Selection":
When you select the Auswahl/ Selection Button, a Dialog box is opened into which you can type ANY value between 0 and 2,000. See the 2nd attached INPA Screen for what that looks like. If you Enter 1020 and click OK (so you can Test VANOS as described below), that will remain the idle speed maintained UNTIL you return to this screen and enter a different speed, OR use the F1 thru F4 buttons to change speed. You can leave this menu (F10 Zuruck/ Go Back) to go to VANOS Screen, and newly-selected idle speed is maintained.
III. Control VANOS Solenoids & View Actual Cam Advance: DME > F6 > F1 > F4 VANOS:
When you press that Menu Selection sequence, you will see a screen like the THIRD attached screen. (WITHOUT the Red English Translation/Notes ;-) Some IMPORTANT things to note about ANY "F6 Activations" Screen. ALWAYS read and understand the "Control Conditions"/ "Ansteuerbedingung" which in this case say "Drehzahl > 1000 1/min = Rotational Speed (RPM) Greater Than 1,000 RPM. In this case, if you did NOT use the steps explained above to get RPM > 1000, INPA would simply tell you "test conditions NOT met" and nothing would happen, but DON'T press your luck and just randomly push buttons without translating/ understanding the "conditions".
When I first saw the Instruction: "Increase above Idle Speed WITHOUT pressing Accelerator Pedal", I wondered: HOW can you do THAT? Some INPA engineer must have had a LOT of chuckles over that one. :tsk: I had to go through ALL the DME INPA Screens to see what each showed, and translate/ experiment with each to find the "key". My version of INPA still has the Menus in German, and the Menu choice for this screen is "EOL LL-Erhöhung Bandende". So after opening that screen and seeing Idle (Leerlauf) values, I had an epiphany. So THAT's WHAT LL Stands for?!? I'm sure those sneaky
German guys had "Hidden" a LOT of other good Info. :thumbup: It's AMAZING what you miss when you don't speak German and don't understand the German abbreviations. The TIS wiring diagrams are FULL of those abbreviations, beginning with wire colors, but that's JUST the beginning.
You can use ANY "F6 Activation" Screen to simply Monitor system conditions in Real Time, or as Live Data, WITHOUT Over-riding DME Control of the Component. That is True for any electrically-controlled component, such as VANOS Solenoids, Coolant Pump, Fuel Pump, Thermostat, etc. OR, you can choose to Activate the Component using INPA or ISTA, and see if THAT Component, Solenoid, Motor, etc, responds as it should.
You can use this VANOS Solenoid Activation Screen to test Solenoid oil supply to the VANOS Units and corresponding Cam Position Sensor Readout to see if each Cam Advances as it should. In the 3+ years that I have followed Forums, it appears that MANY people unnecessarily replace VANOS Solenoids, often at a cost of ~ $200 each, ONLY to find that does NOT correct the issue which caused them to believe a Solenoid needed Replacing.
INPA Tutorial Quickstart (Functional Jobs examples):
I. Procedure: Setup Hardware, Windows 10 OS:
AFTER Downloading & Installing Software: Set to Com Port 1, Latency 1
1) Attach K+DCAN Cable to computer USB Port (but NOT OBD II Socket)
2) Open Control Panel & Select Device Manager
3) In Device Manager, Select “Ports (COM & LPT)” which ONLY appears if Cable connected
4) DoubleClick USB Serial Port & select Port Settings Tab & click “Advanced” box
5) Set Com Port # = “COM1” & set Latency Timer (msec) = “1”
6) If your Cable has a slide switch on the Large Connector which attaches to the OBD II Socket, check to make sure it is in correct position. For example, BimmerGeeks Pro cable, proper position is to right as you hold pins UP with switch facing you. This is a pin bridge, and correct switch position varies between models.
NOTE: Check these settings if you can’t connect to a module, or have program STOP a function after a screen has opened, or if only part of a screen opens or displays.
II. Functional Jobs:
A. Primary Uses, F2, Identification, and F4, Fault Memory, ALL Modules:
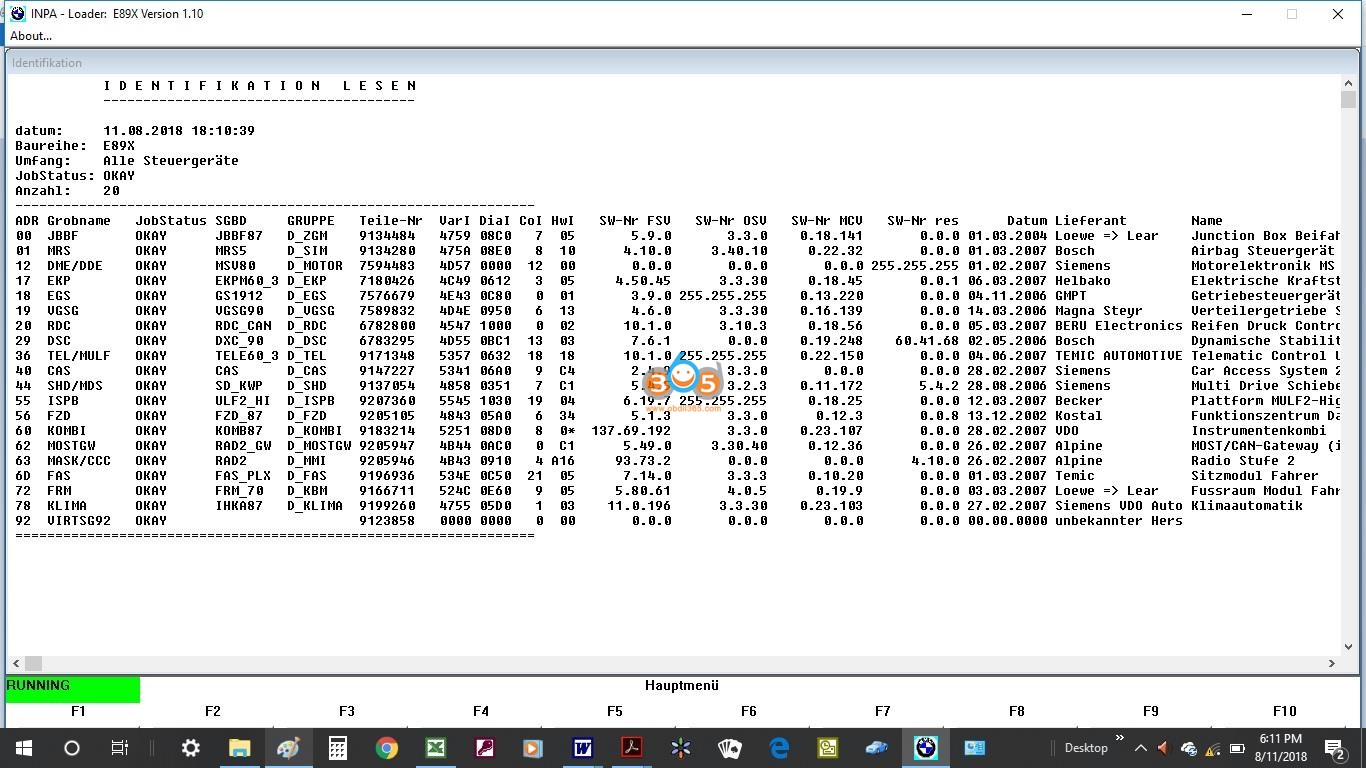
F2, Identification: provides identification of EACH of the ~ 20 modules in your vehicle (some more, some less, depending upon optional equipment) including SGBD ID Code for module. Recommended that you SAVE that screen for future reference.
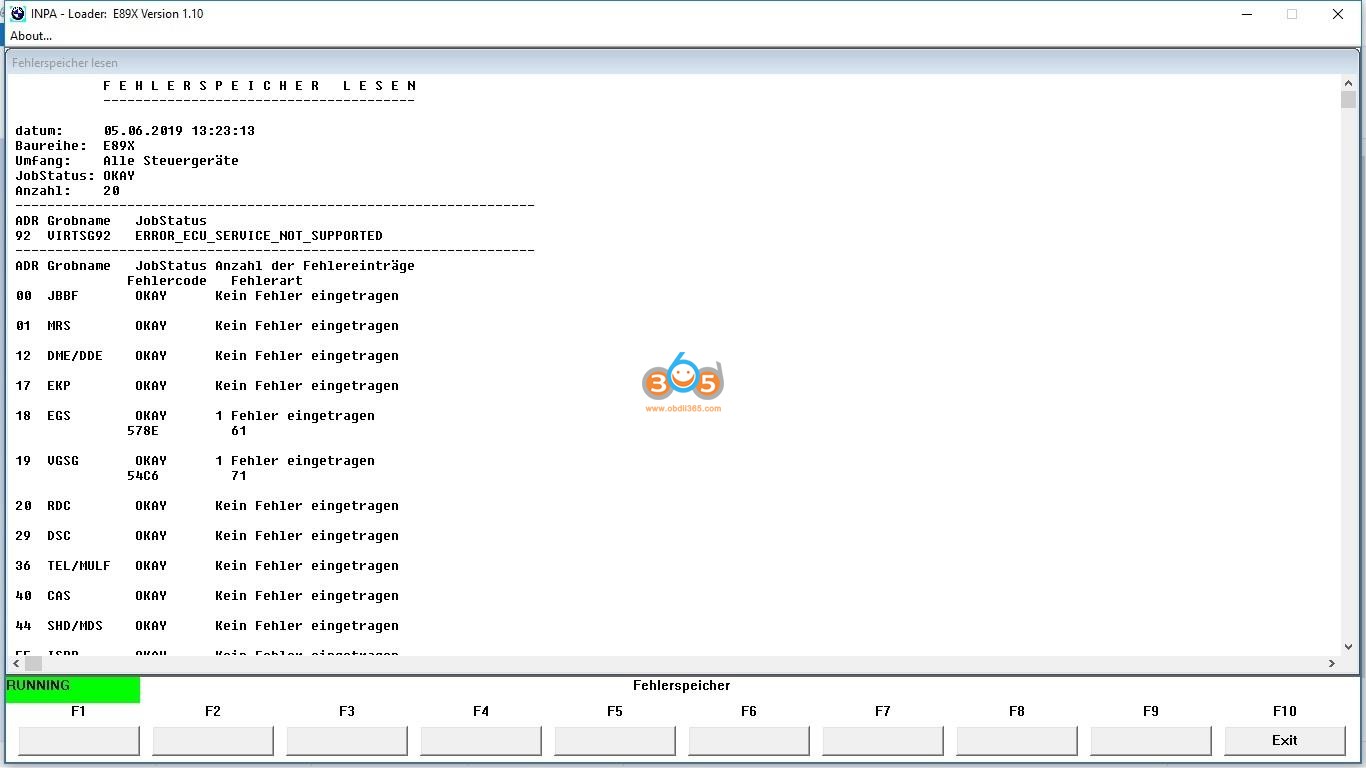
F4, Fault Memory, All Modules: provides a quick readout of status of Fault Memory of each Module, listing any Fault Code found in any module; stating No error registered (Kein Fehler eingetragen), if NONE for that Module. This is ONLY the code, NO Fault Code Definition.
B. Procedure to Display F2 or F4 Screens:
1) At INPA opening screen, Select E90 (E91/E92/E93) Function key varies between Versions;
2) Script Selection Box appears, with Left & Right Listboxes;
3) “Select E90 V1.xx” highlighted in Left Listbox at open; Press Tab to move to Right Listbox;
4) Press Cursor Down Arrow to Highlight “Functional Jobs” in Right Listbox; Press Enter;
5) Functional Jobs Menu, Press < F2 > Identification or < F4 > Fault Memory (Fehlerspeicher);
C. Saving Screens; Uses & Procedure:
You will almost certainly find that you want to save an INPA screen: (1) to have a historical record of faults, (2) to be able to post a screen on a Forum, (3) to translate it, or even (4) to keep some or all screens you open in a folder named for that Module, so you have a reference for what INPA can do or show you related to that Module. ONE WAY to do that (there are others):
1) Have a photo editor (such as “Paint” – Windows Accessory) open & running in background BEFORE you open INPA;
2) Open INPA screen to be Saved; press Shft+PrtSc to “print screen”/save it in temp memory;
3) Alt+Tab to navigate to Paint; Ctrl+V to paste screenprint to Paint;
4) SaveAs jpg file format in Folder/Subfolder of your choice, with helpful descriptive name.
5) In Paint, press Ctrl+N to clear screen to be ready for NEW “Paste & SaveAs.
Example of Filename & Folder Format: I do a “Functional Jobs” check for Fault Codes in ALL Modules ~ every 3 months. To maintain an historical record of Faults (or hopefully Lack Thereof ;-) I SAVE the screen each time in a Subfolder “Functional Jobs” where the other subfolders are named for each Module, such as DME, EGS, FRM, etc. When I last saved a screenprint of Fault Memory, ALL modules, on June 5, 2019, I gave it a FileName: 190606 FS1 or FS2 (two pages due to short screen). That yymmdd first name results in automatic sorting by date, and the FS1 stands for Fehlerspeicher1 or 1st page of Fault Memory. NOTE: I have Fluid Wear Faults in BOTH EGS & VGSG.
Whatever works for YOU, but keeping records of stuff is important, and how you keep them becomes MORE important the More Stuff you keep. One of the BIGGEST advantages of a computer-based software vs. Carly or such is the ability to EASILY & Quickly save a copy of a screen. INPA automatically saves some screens in temporary txt files in the “BIN” folder which you can retrieve BEFORE they get overwritten, but since electronic file storage is cheap these days, it really becomes what is quicker & easier, and the jpg file works for bar graphs & other graphics in F5 (Status) screens (See Below).
III. Connecting to Modules:
A. Why Connect to a Single Module?
Functional Jobs – a Starting Point ONLY: There are NO Fault Code DEFINITIONS, Freeze Frame Data or Fault Details, PLUS there is a LOT more to INPA than just Fault Codes (summarized below). There’s NOT much diagnostic information in a 4-character code that means NOTHING without a definition.
So you have to connect to a single Module: to find out what is going on NOW, or has gone on in the past, and to be able to see Parameters or PIDs (Inputs to that Module in Real Time), or to do “Activations” or tests of Outputs from the Module to a Motor or other component.
B. What Information is Available when you Connect to a Single Module?
1. F1: Information about Module; F2: Identification of the Module:
Press F1 & F2: at Main Menu for any Module and see/Save data about that module from Part#, Name of Supplier, Variant Information, etc. Suggest Saving F1 & F2 screens as reference for each module in your vehicle.
2. F4: Fehlerspeicher; Fault Memory & Memory History:
Fault Codes: both in P-code format & in BMW FC format
Fault Code DEFINITIONS: often in German requiring translation
Fault Code Details: such as whether or not the fault is currently present or would light a warning lamp; the mileage/km at which the fault code was saved; other conditions such as Voltage or Temperature when fault was saved; the type of signal fault (high/low/none), etc.
Freeze Frame Data: in DME faults you will see a snapshot of Parameters at the moment the fault code was saved, such as Engine Temp, RPM, Load, System Voltage, etc.
History speicher or Memory History in DME: where Fault Codes that happened years ago and were cleared are still recorded, along with mileage/km when saved, and other details
Faults that do NOT light a warning lamp: such as Oil Wear Faults in Transmission or Transfer Case. Actually, these appear in Functional Jobs but without Definition or Details
3. F5: Status; Parameters; Live Data; Inputs to Modules from Sensors/Switches:
4. F6: Activations (Steuern); Test/Activate Module Outputs & Attached Motors:
Examples of F5 & F6 functions for Each Module will be provided, beginning with DME & IHKA Modules. WATCH THIS SPACE
IV. Functional Jobs Screens, Example Screens for my 2007 328xi:
Screens will vary depending upon Equipment/Modules/Variants/Options on YOUR vehicle
A. Functional Jobs Main Menu: How to Select:
Screen below appears when E90 selected; press Tab & Down (scroll) Arrow; Press Enter
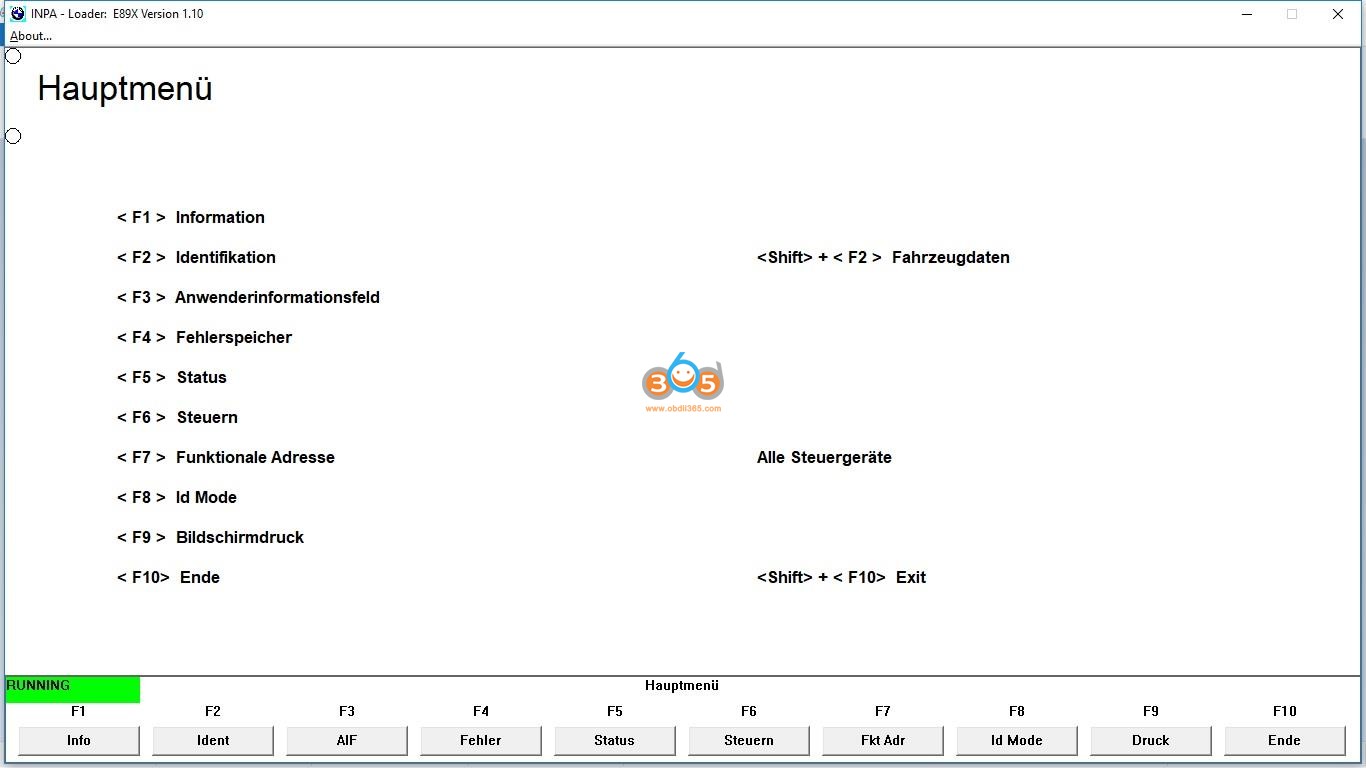
B. Functional Jobs, Main Menu (Hauptmenu):
C. Functional Jobs | F2, Identification, Identifying ALL Modules in Vehicle:
Suggest save & use as reference; NOTE “SGBD” Module Variant, 4th Column
D. Functional Jobs | F4 | F1, Fault Memory, ALL Modules (page 1 of 2):
Kein Fehler eingetragen = No error entered = what you WANT to see
That's all!
TL;DNR Types: LOOK at the attached INPA Screens FIRST before you dismiss.
1. F6, F1, F4 VANOS Activation, En
2. F9, F5 Adjust Idle Speed, En
3. F9, F5, F6 Set RPM Below 2K, En
Specific steps to save & attach INPA Screens are described in attached in the last paragraph (INPA Tutorial Quickstart (Functional Jobs examples). Generally, N51 & N52 Engines use either MSV70 or MSV80 (2007 & Later) DME Variants; N54 Engine uses mostly MSD80 DME Variant, and Later N55 Engine used MEVD17x Variant. To connect with ANY module, you need to know the VARIANT to make proper selection from the Right-hand Listbox.
II. Change Idle Speed Setpoint: DME > F9 > F5 Idle Speed Adjustment:
Some Functions or Activations, such as VANOS Activation described below, require a certain Idle Speed. Also, you may want to reset your idle speed (Setpoint or Target Speed) if you find your warm engine idle too High/too Low. With INPA, it's so simple, even I can do it.
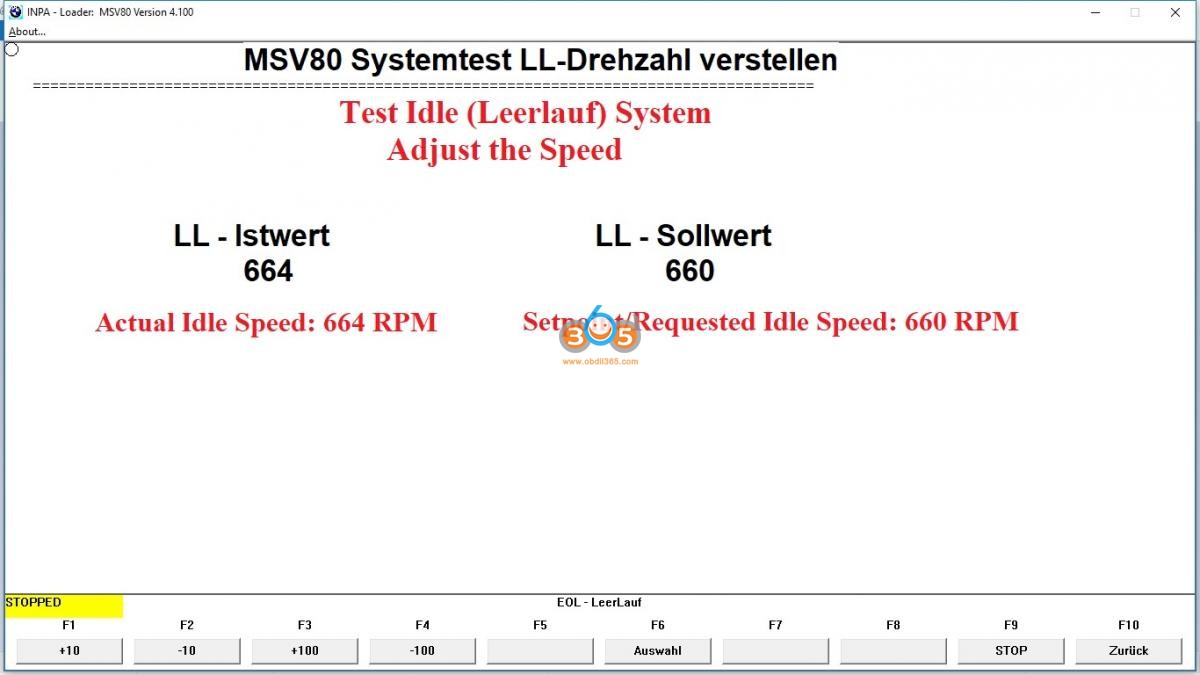
A. Open DME > F9 System Diagnosis > F5 Increase Idle Speed:
When you press/click that Menu Selection sequence you should see the First Screen attached Below, which simply shows the current ACTUAL RPM, and the Setpoint or Requested speed: 664 & 660 RPM respectively in my case. This screen as opened allows you to simply OBSERVE or view current setpoint & Actual Idle Speed (Live Data), BUT if you see the Submenu choices you can click on in the INPA "Taskbar", you see you can add or subtract in increments of 10 or 100 RPM by simply clicking the buttons. OR, you can select F6 Auswahl (Selection) as described below.
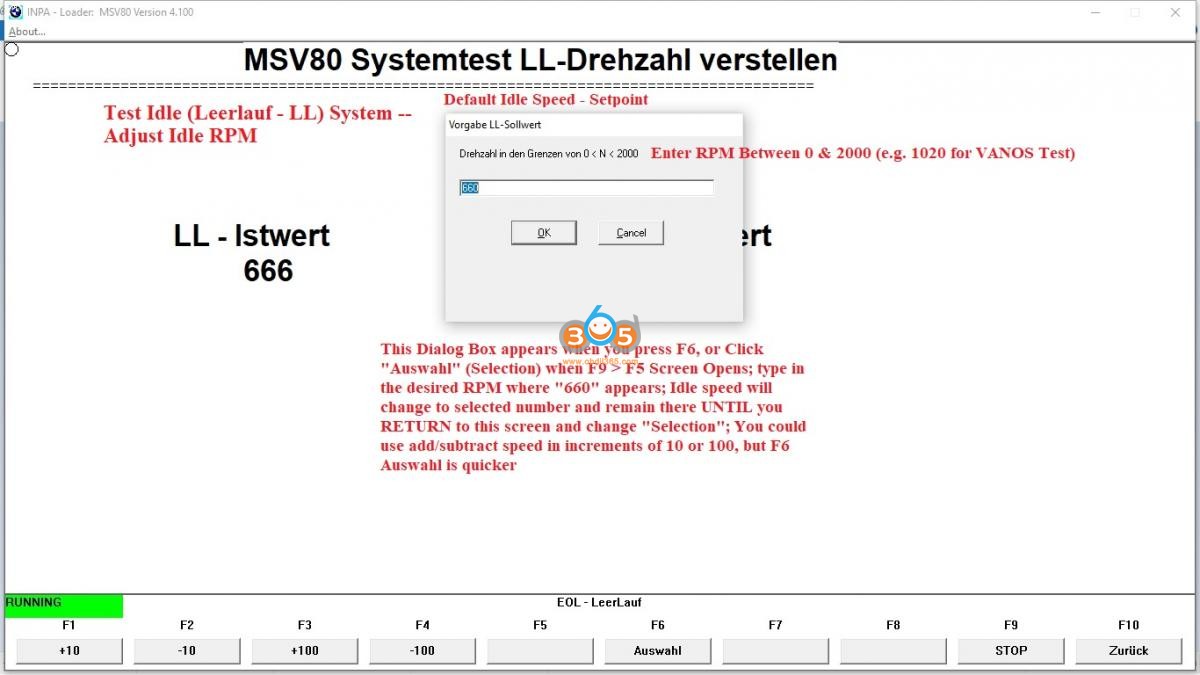
B. Enter Specific Desired RPM: DME > F9 > F5 > F6 Auswahl "Selection":
When you select the Auswahl/ Selection Button, a Dialog box is opened into which you can type ANY value between 0 and 2,000. See the 2nd attached INPA Screen for what that looks like. If you Enter 1020 and click OK (so you can Test VANOS as described below), that will remain the idle speed maintained UNTIL you return to this screen and enter a different speed, OR use the F1 thru F4 buttons to change speed. You can leave this menu (F10 Zuruck/ Go Back) to go to VANOS Screen, and newly-selected idle speed is maintained.
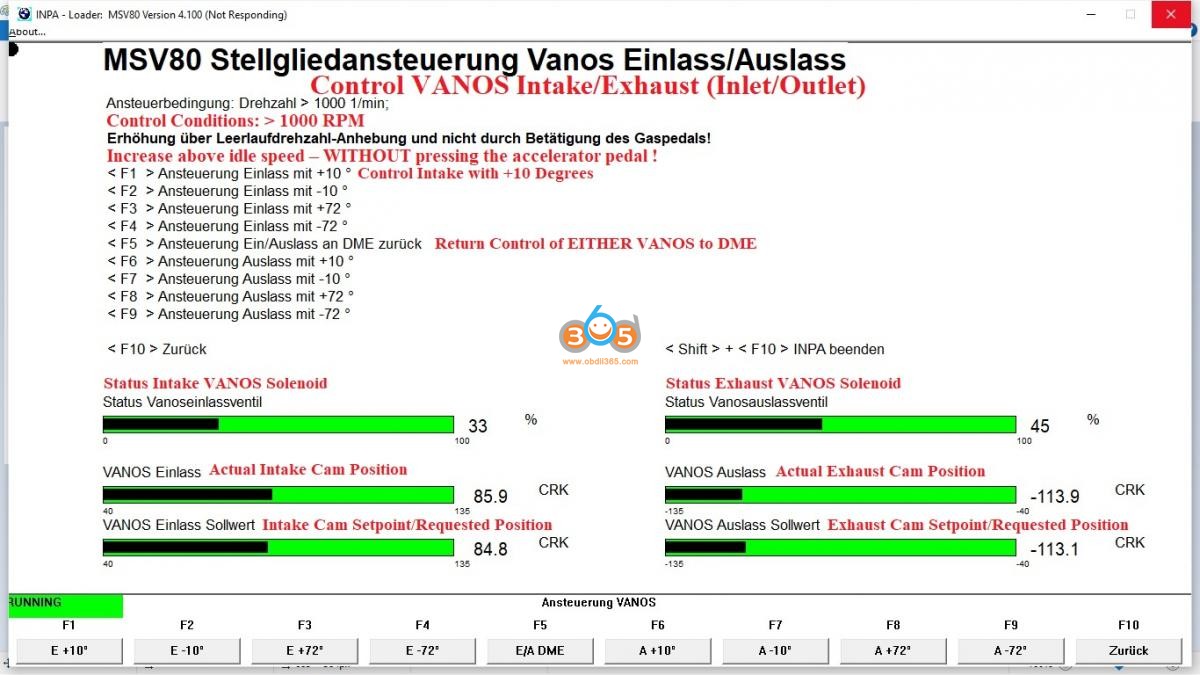
III. Control VANOS Solenoids & View Actual Cam Advance: DME > F6 > F1 > F4 VANOS:
When you press that Menu Selection sequence, you will see a screen like the THIRD attached screen. (WITHOUT the Red English Translation/Notes ;-) Some IMPORTANT things to note about ANY "F6 Activations" Screen. ALWAYS read and understand the "Control Conditions"/ "Ansteuerbedingung" which in this case say "Drehzahl > 1000 1/min = Rotational Speed (RPM) Greater Than 1,000 RPM. In this case, if you did NOT use the steps explained above to get RPM > 1000, INPA would simply tell you "test conditions NOT met" and nothing would happen, but DON'T press your luck and just randomly push buttons without translating/ understanding the "conditions".
When I first saw the Instruction: "Increase above Idle Speed WITHOUT pressing Accelerator Pedal", I wondered: HOW can you do THAT? Some INPA engineer must have had a LOT of chuckles over that one. :tsk: I had to go through ALL the DME INPA Screens to see what each showed, and translate/ experiment with each to find the "key". My version of INPA still has the Menus in German, and the Menu choice for this screen is "EOL LL-Erhöhung Bandende". So after opening that screen and seeing Idle (Leerlauf) values, I had an epiphany. So THAT's WHAT LL Stands for?!? I'm sure those sneaky
German guys had "Hidden" a LOT of other good Info. :thumbup: It's AMAZING what you miss when you don't speak German and don't understand the German abbreviations. The TIS wiring diagrams are FULL of those abbreviations, beginning with wire colors, but that's JUST the beginning.
You can use ANY "F6 Activation" Screen to simply Monitor system conditions in Real Time, or as Live Data, WITHOUT Over-riding DME Control of the Component. That is True for any electrically-controlled component, such as VANOS Solenoids, Coolant Pump, Fuel Pump, Thermostat, etc. OR, you can choose to Activate the Component using INPA or ISTA, and see if THAT Component, Solenoid, Motor, etc, responds as it should.
You can use this VANOS Solenoid Activation Screen to test Solenoid oil supply to the VANOS Units and corresponding Cam Position Sensor Readout to see if each Cam Advances as it should. In the 3+ years that I have followed Forums, it appears that MANY people unnecessarily replace VANOS Solenoids, often at a cost of ~ $200 each, ONLY to find that does NOT correct the issue which caused them to believe a Solenoid needed Replacing.
INPA Tutorial Quickstart (Functional Jobs examples):
I. Procedure: Setup Hardware, Windows 10 OS:
AFTER Downloading & Installing Software: Set to Com Port 1, Latency 1
1) Attach K+DCAN Cable to computer USB Port (but NOT OBD II Socket)
2) Open Control Panel & Select Device Manager
3) In Device Manager, Select “Ports (COM & LPT)” which ONLY appears if Cable connected
4) DoubleClick USB Serial Port & select Port Settings Tab & click “Advanced” box
5) Set Com Port # = “COM1” & set Latency Timer (msec) = “1”
6) If your Cable has a slide switch on the Large Connector which attaches to the OBD II Socket, check to make sure it is in correct position. For example, BimmerGeeks Pro cable, proper position is to right as you hold pins UP with switch facing you. This is a pin bridge, and correct switch position varies between models.
NOTE: Check these settings if you can’t connect to a module, or have program STOP a function after a screen has opened, or if only part of a screen opens or displays.
II. Functional Jobs:
A. Primary Uses, F2, Identification, and F4, Fault Memory, ALL Modules:
F2, Identification: provides identification of EACH of the ~ 20 modules in your vehicle (some more, some less, depending upon optional equipment) including SGBD ID Code for module. Recommended that you SAVE that screen for future reference.
F4, Fault Memory, All Modules: provides a quick readout of status of Fault Memory of each Module, listing any Fault Code found in any module; stating No error registered (Kein Fehler eingetragen), if NONE for that Module. This is ONLY the code, NO Fault Code Definition.
B. Procedure to Display F2 or F4 Screens:
1) At INPA opening screen, Select E90 (E91/E92/E93) Function key varies between Versions;
2) Script Selection Box appears, with Left & Right Listboxes;
3) “Select E90 V1.xx” highlighted in Left Listbox at open; Press Tab to move to Right Listbox;
4) Press Cursor Down Arrow to Highlight “Functional Jobs” in Right Listbox; Press Enter;
5) Functional Jobs Menu, Press < F2 > Identification or < F4 > Fault Memory (Fehlerspeicher);
C. Saving Screens; Uses & Procedure:
You will almost certainly find that you want to save an INPA screen: (1) to have a historical record of faults, (2) to be able to post a screen on a Forum, (3) to translate it, or even (4) to keep some or all screens you open in a folder named for that Module, so you have a reference for what INPA can do or show you related to that Module. ONE WAY to do that (there are others):
1) Have a photo editor (such as “Paint” – Windows Accessory) open & running in background BEFORE you open INPA;
2) Open INPA screen to be Saved; press Shft+PrtSc to “print screen”/save it in temp memory;
3) Alt+Tab to navigate to Paint; Ctrl+V to paste screenprint to Paint;
4) SaveAs jpg file format in Folder/Subfolder of your choice, with helpful descriptive name.
5) In Paint, press Ctrl+N to clear screen to be ready for NEW “Paste & SaveAs.
Example of Filename & Folder Format: I do a “Functional Jobs” check for Fault Codes in ALL Modules ~ every 3 months. To maintain an historical record of Faults (or hopefully Lack Thereof ;-) I SAVE the screen each time in a Subfolder “Functional Jobs” where the other subfolders are named for each Module, such as DME, EGS, FRM, etc. When I last saved a screenprint of Fault Memory, ALL modules, on June 5, 2019, I gave it a FileName: 190606 FS1 or FS2 (two pages due to short screen). That yymmdd first name results in automatic sorting by date, and the FS1 stands for Fehlerspeicher1 or 1st page of Fault Memory. NOTE: I have Fluid Wear Faults in BOTH EGS & VGSG.
Whatever works for YOU, but keeping records of stuff is important, and how you keep them becomes MORE important the More Stuff you keep. One of the BIGGEST advantages of a computer-based software vs. Carly or such is the ability to EASILY & Quickly save a copy of a screen. INPA automatically saves some screens in temporary txt files in the “BIN” folder which you can retrieve BEFORE they get overwritten, but since electronic file storage is cheap these days, it really becomes what is quicker & easier, and the jpg file works for bar graphs & other graphics in F5 (Status) screens (See Below).
III. Connecting to Modules:
A. Why Connect to a Single Module?
Functional Jobs – a Starting Point ONLY: There are NO Fault Code DEFINITIONS, Freeze Frame Data or Fault Details, PLUS there is a LOT more to INPA than just Fault Codes (summarized below). There’s NOT much diagnostic information in a 4-character code that means NOTHING without a definition.
So you have to connect to a single Module: to find out what is going on NOW, or has gone on in the past, and to be able to see Parameters or PIDs (Inputs to that Module in Real Time), or to do “Activations” or tests of Outputs from the Module to a Motor or other component.
B. What Information is Available when you Connect to a Single Module?
1. F1: Information about Module; F2: Identification of the Module:
Press F1 & F2: at Main Menu for any Module and see/Save data about that module from Part#, Name of Supplier, Variant Information, etc. Suggest Saving F1 & F2 screens as reference for each module in your vehicle.
2. F4: Fehlerspeicher; Fault Memory & Memory History:
Fault Codes: both in P-code format & in BMW FC format
Fault Code DEFINITIONS: often in German requiring translation
Fault Code Details: such as whether or not the fault is currently present or would light a warning lamp; the mileage/km at which the fault code was saved; other conditions such as Voltage or Temperature when fault was saved; the type of signal fault (high/low/none), etc.
Freeze Frame Data: in DME faults you will see a snapshot of Parameters at the moment the fault code was saved, such as Engine Temp, RPM, Load, System Voltage, etc.
History speicher or Memory History in DME: where Fault Codes that happened years ago and were cleared are still recorded, along with mileage/km when saved, and other details
Faults that do NOT light a warning lamp: such as Oil Wear Faults in Transmission or Transfer Case. Actually, these appear in Functional Jobs but without Definition or Details
3. F5: Status; Parameters; Live Data; Inputs to Modules from Sensors/Switches:
4. F6: Activations (Steuern); Test/Activate Module Outputs & Attached Motors:
Examples of F5 & F6 functions for Each Module will be provided, beginning with DME & IHKA Modules. WATCH THIS SPACE
IV. Functional Jobs Screens, Example Screens for my 2007 328xi:
Screens will vary depending upon Equipment/Modules/Variants/Options on YOUR vehicle
A. Functional Jobs Main Menu: How to Select:
Screen below appears when E90 selected; press Tab & Down (scroll) Arrow; Press Enter
B. Functional Jobs, Main Menu (Hauptmenu):
C. Functional Jobs | F2, Identification, Identifying ALL Modules in Vehicle:
Suggest save & use as reference; NOTE “SGBD” Module Variant, 4th Column
D. Functional Jobs | F4 | F1, Fault Memory, ALL Modules (page 1 of 2):
Kein Fehler eingetragen = No error entered = what you WANT to see
That's all!