[Online Activation] One Year Software Update of LAUNCH X431 PAD VII Diagnostic Tool
TOOLS in EU TAX FREE
TOOLS in US TAX FREE
We are here to provide you with a Better Price:
Email: Sales@OBDII365.com
Whatsapp:+86 18150118226
Business Whatsapp: +44 7418605489
Product Description
Please send us the serial number before purchase, we will check it first.
Features:
This renewal card is used for LAUNCH X431 PAD VII.
With Launch Renewal Card, you can update your device subscription anytime within a few minutes.
No longer worry about your subscription expiring at the most inopportune moment.
No need to find a dealer phone or go to the office to buy updates.
No need to create an FXO order in your personal account.
Just buy the renewal card and activate it in your app.
Notice:
To avoid the delivery is losing and fast update for your x431, we can send the password only to you.
Once the renewal card is sent to you, returns and exchanges will not be allowed!
If your PAD VII fault guidance reported error 800, Download known error, software subscription has expired, need to renew software.

SUGGESTION:


We are here for you:
Skype: OBDII365.com
Email: Sales@OBDII365.com
Whatsapp : +86 18150118226
Business Whatsapp: +44 7418605489

Videos
How to Register Launch X431 PAD III v2.0?
Launch X431 PAD III Function Introduction
Tech Support
The diagnostic method on Launch X431 PAD 3 is different for passenger vehicles and commercial vehicles (gasoline and diesel). The possible communication can be:
WiFi, Bluetooth and USB cable.
Passenger vehicles:
X-431 PAD III tablet supports 2 communication methods with the VCI connector:
wireless Bluetooth and USB cable.
You may choose any one of the methods to diagnose a vehicle.
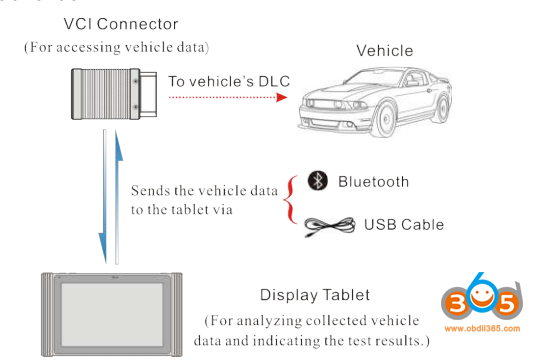
*Notes:
- While using the diagnosis via Bluetooth, the VCI connector should be paired with the tablet. If no Bluetooth setting is done before diagnostic software is launched, you can also configure it while using the software.
- To obtain stable communication, you are strongly recommended to perform the vehicle diagnosis via USB cable. In this case, the USB cable is required to connect the VCI connector and the tablet.
- Communication via Bluetooth:
There are two kinds of ways available for the tablet III to pair with the VCI connector.
- Connect one end of the USB cable (optional) to the Mini USB port of the VCI connector.
- Connect the other end to the USB port of the PC. The power indicator of the VCI connector lights up.
- Enter Bluetooth setting screen by tapping “Tablet Settings” -> “Bluetooth”, slide the Bluetooth switch to ON and the tablet starts searching for all available Bluetooth device.
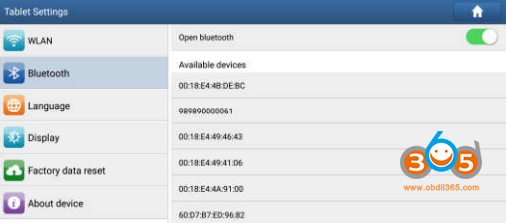
- Tap the desired VCI connector to pair and match. By default, the Bluetooth name of the connector is 98********00 (where ***** stands for 8 digits.).
- If the Bluetooth pair request pops up on the screen, enter the request pin code (default code: 0000 or 1234).
- Once the connector is paired with the tablet, “Paired” appears and the connector will be shown under the paired device tab.
*Note: In case no Bluetooth setting is done before diagnostic software is launched, you can also configure it in process of vehicle diagnosis.
- Communication by a USB cable:
The USB cable connection is a simple & quick way to establish communication between the tablet and the VCI module.
After properly connecting the USB cable from the tablet to the VCI, the VCI navigation button at the bottom of the screen becomes highlighted indicating the USB connection is successful.
*Note: The USB connection provides the most stable and fastest communication. When all communication methods are applied at the same time, the X-431 PAD III system will use the USB communication as the default priority.
Commercial vehicles (Gasoline & Diesel):
X-431 PAD III tablet supports 3 communication methods with the VCI connector:
wireless Bluetooth and USB cable.
Choose any one of the methods to diagnose a vehicle.
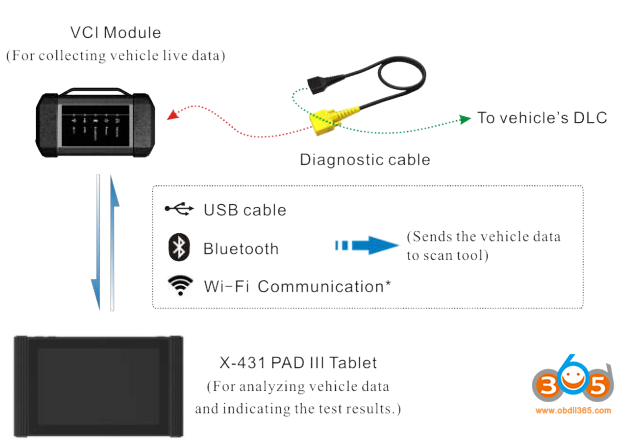
*Notes:
- While using the diagnosis via Bluetooth, the VCI module should be paired with the X-431 PAD III tablet. If no Bluetooth setting is done before diagnostic software is launched, you can also configure it while using the software.
- To obtain stable communication, you are strongly recommended to perform the vehicle diagnosis via USB cable. In this case, the USB cable is required to connect the VCI module and the X-431 PAD III tablet.
- To ensure that the X-431 PAD III tablet can work with the VCI module via Wi-Fi communication, a Wi-Fi configuration is required. Refer to Chapter 4.5.3 for details. When all communication methods are applied at the same time, the X-431 PAD III system will use the USB communication as the default priority.
- Communication via Bluetooth:
- Enter Bluetooth setting screen by tapping “Tablet Settings” -> “Bluetooth”, slide the Bluetooth switch to ON and the tablet will start searching for all available Bluetooth devices.
- Tap the desired VCI module to pair and match. By default, the Bluetooth name of the VCI module is 98********00 (where ******** stands for 8 digits).
- If the Bluetooth pair request pops up on the screen, input the request pin code (default code: 0000 or 1234).
- When pairing is successfully done, the VCI module will be shown on the top of the “Paired devices” list.
*Notes:
- To make sure that the tablet has paired up with the VCI module via Bluetooth, “Personal Center”-> “VCI Management” to check whether the VCI module is paired up or not.
- If you logged in the account on another diagnostic tool and the VCI module has ever been paired up with that tool, you need to cancel pairing first before using a different tool to proceed new diagnostic session. Tap “Tablet Settings” -> “Bluetooth” -> Tap the desired VCI connector to unpair it.
In case no Bluetooth setting is done before diagnostic software is launched, you can also configure it in process of vehicle diagnosis.
- Communication by a USB cable:
The USB cable connection is a simple & quick way to establish communication between the tablet and the VCI module.
After properly connecting the USB cable from the tablet to the VCI, the VCI navigation button at the bottom of the screen becomes highlighted indicating the USB connection is successful.
*Note: The USB connection provides the most stable and fastest communication. When all communication methods are applied at the same time, the X431 PAD III system will use the USB communication as the default priority.
- Wi-Fi communication
- After logging successfully, tap “Personal Center” -> “VCI Management”.
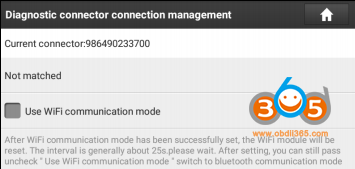
- Check the box “Use Wi-Fi communication mode”, the system will search for VCI module automatically.
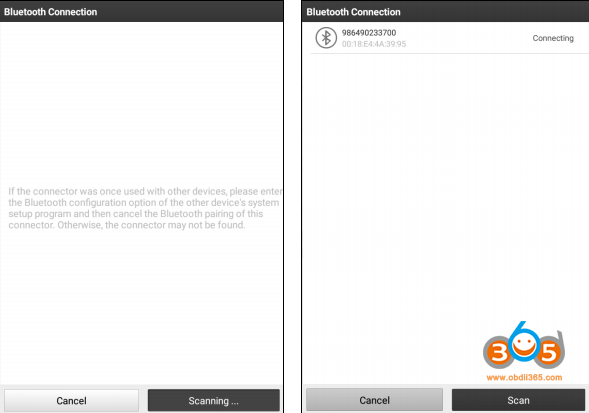
- Tap the desired VCI module and a pairing request similar to Fig. 4-19 will appear:

- Tap “PAIR” to start pairing. Once the pairing is successfully done, the screen displays:
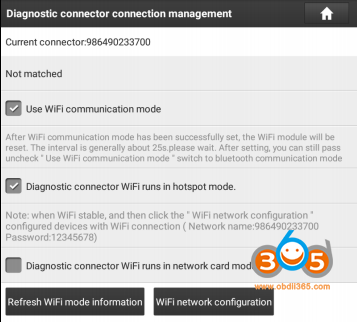
- There are two Wi-Fi communication modes available for the VCI module.
– Work as Wi-Fi hotspot: Once enabled, the VCI module and then tablet automatically connect and form a LAN network to make communication. In this case, the tablet cannot surf the Internet. – Work as network adaptor: Once enabled, a Wi-Fi connection dialog box appears
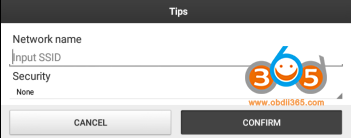
Input the Wi-Fi network name and access password (if the network is encrypted) until it is properly connected. In this case, the tablet can surf the Internet and communicate with the VCI module.
…. Start diagnosis….
![[Online Activation] One Year Software Update of LAUNCH X431 PAD VII Diagnostic Tool](/upload/pro-md/23120617018513127733.jpg)
![[Online Activation] One Year Software Update of LAUNCH X431 PAD VII Diagnostic Tool](/upload/pro-md/23041116812808689596.jpg)

