Set up BMW ICOM DHCP server on external router for ECU flash
I made a definitive guide of how to set up DHCP server on an external router for BMW ECU flashing with BMW ICOM diagnostic tool.
Why is this necessary?
When flashing specific modules (KOMBI, NBT,..) on F and G series, the
ICOM switches between different IP addresses and therefore loses sync with the computer. In order to resolve this issue, there needs to be a DHCP server between the ICOM and PC, which redirects any traffic on the selected MAC address (in this case the ICOM’s MAC address) to a specified IP address.
All three connected devices (PC, ROUTER and ICOM incl. icom a1, icom a2, icom next) need to be set to DHCP.
In this tutorial, I used an old D-Link DIR-300 router. You can use any router that supports setting its’ netmask to 255.255.0.0 and has the capability for DHCP server.
Step-by-step instructions:
Before this, you need to turn off your Windows Firewall !
Step 1: Configure your PC to DHCP
Go to Control Panel > Network Connections > Ethernet>Properties
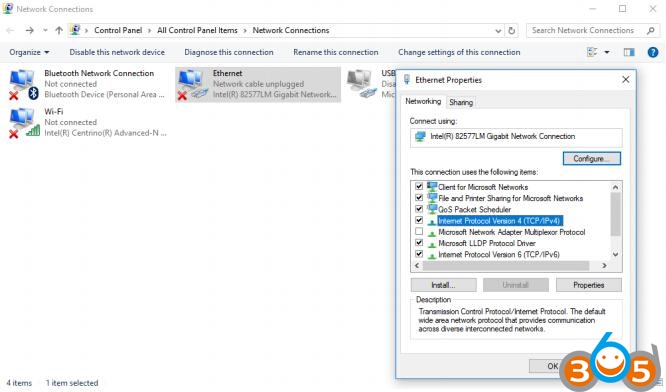
Select: Internet Protocol Version 4 (TCP/IPv4) and click Properties.
Both tabs need to be as follows:
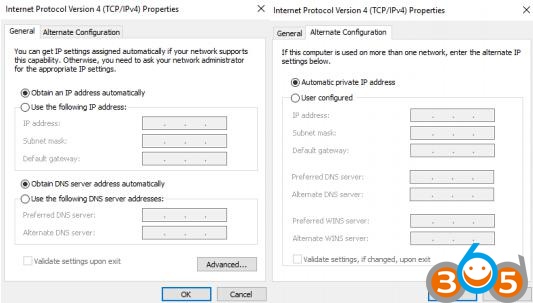
When you now connect something with LAN cable, your Ethernet card under Control Panel > Network Connections > Ethernet>Details should now show DHCP Enabled Yes.
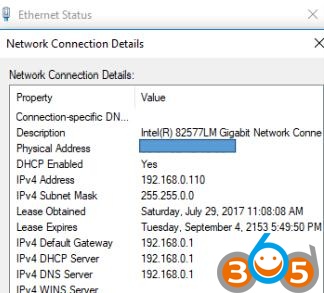
Step 2: Configure your ICOM to DHCP
Connect your ICOM to the car’s OBD2 port, wait for it to power on and connect it to your PC via LAN cable. Wait a minute or two to be recognized by the PC.
In iToolRadar or Dr. Gini take a look at your ICOM’s assigned IP address. Copy it into your web browser (I use Google Chrome) and at the end add :60080 (this is the port fort the settings).
Example: http://169.254.97.140:60080/
You will then be asked for a Login username and password.
Username: root Password: NZY11502
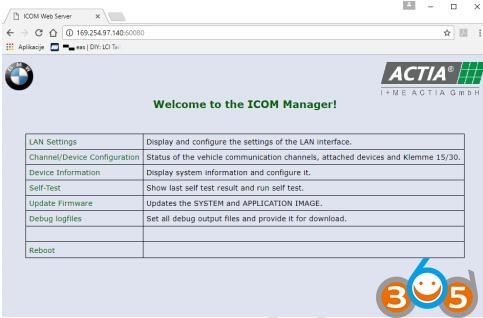
Under LAN settings make sure your ICOM is set to DHCP. Make a note of the ICOM’s subnet mask.
Step 3: Configure your router for DHCP server.
Disconnect ICOM, power up your router and connect it to your PC via LAN cable. Use the router’s LAN ports.
Open Command Prompt (CMD) and type in ipconfig.
You will see a list of your Connection Cards configurations. Under LAN you will see your router’s IP addresses. Copy the Default gateway IP address into your internet browser. This time you do not add any port number at the end. P.S.: If there is no Default gateway listed, make a hard reset of your router with its’ physical reset button.
Type in the username and password of your router. The default username is usually admin and the password is either nothing/blank or also admin.
Now go under advanced and turn off your router’s firewall. In my case it is under ADVANCED>Firewall&DMZ. Disable SPI, save settings.
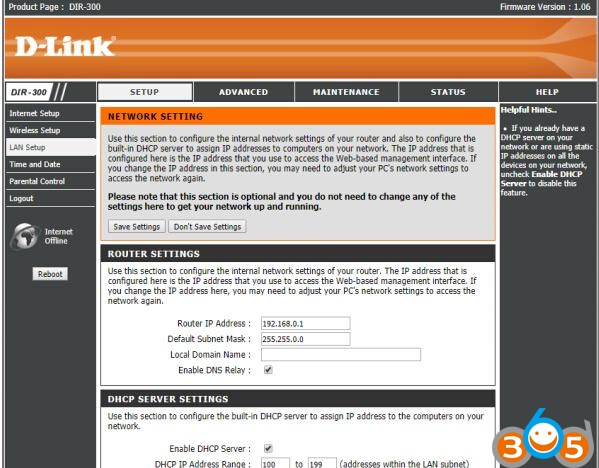
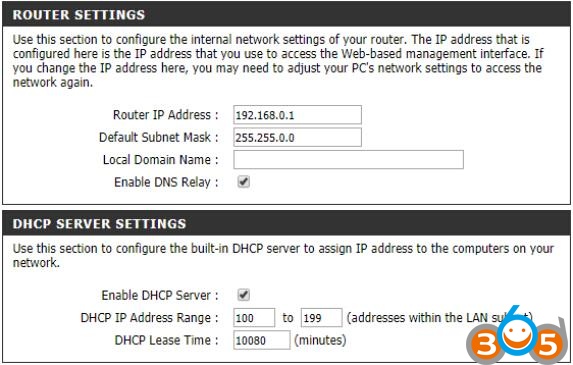
Then go to LAN settings and assign 192.168.0.1 with subnet mask
255.255.0.0 to your router.
Important: The subnet mask of the router needs to match ICOM’s subnet mask. Enable DHCP server.
Set the pool to be between 100 and 199.
Save settings and reboot your router.
The DHCP Client list should now be populated with your PC’s address. If not, physically power off and on your router (maybe also PC), then check again.
Settings should look like this:
And your PC listed under DHCP client List.
Step 4: Connect everything together
Power off your router, disconnect it from your PC, disconnect your ICOM from the car and LAN. No device should be connected via LAN to anything at this point and both router as well as ICOM should be powered off.
Follow this exact order:
? Power on your router. Wait 2 min for it to fully boot up.
? Connect ICOM to the car’s OBD2 port and wait for it to fully boot up. ? Connect ICOM to the router via LAN cable. Use the LAN ports on the router (port number does not matter). Wait a minute or two.
? Connect your PC to the router via LAN cable. Use the LAN ports on the router (port number does not matter). Wait for the PC to recognize the router.
? In web browser connect to your router’s settings menu as described in step 3. Take a look at the DHCP Client list under LAN settings. Your ICOM and PC should be listed.
? Open iToolRadar or Dr. Gini and you should see your ICOM listed with an IP address of 192.168.0.x, where x is a number between 100 and 199.
This is it. You can now open ISTA/D and run a vehicle test with your BMW ICOM. If ISTA/D recognizes your vehicle fully, you are all set. If not, there is a problem and you should not attempt to flash anything.
Good reference may help you out:
How to setup router for Programming KOMBI and NBT
Router DHCP, Icom DHCP and Windows Ethernet: automatic dhcp
First of all the ICOM should be configured this way:
ICOM Config
ConnectionMode = STATIC_IP
Ip = 192.168.68.85
Netmask = 255.255.255.0
Gateway = 192.168.68.99
DHCPSRV.INI
[SETTINGS]
IPPOOL_1=192.168.68.1-254
IPBIND_1=192.168.68.99
AssociateBindsToPools=1
Trace=1
DeleteOnRelease=0
ExpiredLeaseTimeout=3600
[GENERAL]
LEASETIME=86400
NODETYPE=8
SUBNETMASK=255.255.255.0
NEXTSERVER=192.168.68.99
ROUTER_0=192.168.68.1
[DNS-SETTINGS]
EnableDNS=0
[TFTP-SETTINGS]
EnableTFTP=0
ROOT=C:\Users\Osx\Desktop\DHCP\wwwroot
WritePermission=0
[HTTP-SETTINGS]
EnableHTTP=0
ROOT=C:\Users\Osx\Desktop\DHCP\wwwroot
[00-01-A9-00-EE-E9]
IPADDR=192.168.68.1
AutoConfig=06/26/2016 12:41:32
Hostname=ICOM1120134
LeaseEnd=1467070189
Windows Ethernet config:
“Use the following IP Address”
IP 192.168.68.99
Subnet mask 255.255.255.0
Hope this help.