[FREE EXPRESS SHIPPING] Original Scorpio-LK Tango Key Programmer with Basic Software V1.127 Supports Daihatsu G Chip /Toyota H 128 Bit Copy Function
TOOLS in EU TAX FREE
TOOLS in US TAX FREE
We are here to provide you with a Better Price:
Email: Sales@OBDII365.com
Whatsapp:+86 18150118226
Business Whatsapp: +44 7418605489
Related Download Files
Product Description
Original Scorpio-LK TANGO Key Programmer With Basic Software Supports Daihatsu G Chip Function
Highlights
- Cloning of Toyota / Lexus Smart keys on SLK-01, SLK-02, SLK-03/03E, SLK-04/04E, SLK-05/05E, SLK-07E emulators
- Subaru Image Generation Page1 14, 17
- TangoPlus Subaru Smart Key (Page1 F1, F3) Systems OBD framework
- Toyota-H Immobilizer All Keys Lost solution (Gen1 MCU 11910 & Gen2 MCU 12xxx) - Tango + Barracuda (all markets)
- Toyota-H Immobilizer All Keys Lost solution (Gen1 MCU 11910) - SLK-06 (all markets)
- Cloning of Toyota H-key [Blade](128bit) on LKP-04
- Toyota/Lexus Smart Key Systems OBD Framework
- Toyota G Immobilizers OBD Reset & Add Key (including EU type)
- Toyota/Lexus H Keys Image Generation Page1 39, 59, 5A, 99, 3A, 7A on TRPWS21 transponder
- Toyota/Lexus G Keys Image Generation and Cloning Page1 19,36,56,96,37,57 on LKP-02,CN5
- Toyota/Lexus/Subaru SmartKey Reset (40/80/128bit)
- FREE Off-line Full Copy of TIRIS DST (ID60-70) onto TPX2,EH2,CN2,CN5,LKP-02
- FREE Image generator ID70 on ID4D
- Image generator ID67/68 on ID4D
- Full FREE production of TP22, TP23, TP24, TP25
- Free write Component Security 7 bytes Tool (Megamos48)
- In-depth Manual and Technical Support Provided
- Searching of the 7th byte by existing car key(Megamos48)
Using Tips
Connect your TANGO to computer with internet, start the software to [help] >> [check update], then you can update Tango to latest software.
Operating system: Win98, WinXP, Vista, Win8, Win8 / 8.1, Win10
Tango Downloads
How to create a key by Tango?
What is Tango Key Programmer?
Tango Key Programmer is intended for the programming of transponders, that are a part of automobile immobilizing systems.
Unlike the previous model the Gambit, the new model Tango is the two-band device that has allowed to add the list of supported transponders with firm Texas Instruments products (Tiris ©).
The TANGO programmer is the next generation of transponder programmer which is continuously developed to cover, read, and write the latest transponders used in the newest vehicle immobilizer technologies.
A new function for reading the Kilometers, VIN, and transponder type for all BMW keys has been added to the BMW software module.
After generating a new transponder with TANGO Programmer, you do not need any additional diagnostic equipment to program the generated transponder to the car. It will start the car directly, even on the new FIAT CODE 2 system, which is also used in PSA Group vehicles. You only have to write the new file back into the immobilizer system.
The ever-expanding list of key makers, currently totaling over 1116 (Over 580 are included with basic software) are available here
Tansponders supported list:
Philips transponders:
PCF7930-31 writing, reading
PCF7935 writing, reading, shadow memory, crypto calculator
PCF7936 writing, reading, modes password, crypto, Manchester & Biphase encodings
PCF7941 transponder, remote, eeprom, Manchester & Biphase encodings
PCF7942 transponder, remote, eeprom, Manchester & Biphase encodings
PCF7943 transponder, remote, Manchester & Biphase encodings
PCF7944 transponder, remote, eeprom, Manchester & Biphase encodings
PCF7945 transponder, remote, eeprom, Manchester & Biphase encodings
PCF7946 transponder, remote, Manchester & Biphase encodings
PCF7947 transponder, remote, eeprom, Manchester & Biphase encodings
PCF7952 transponder, remote, eeprom, Manchester & Biphase encodings
PCF7961 transponder, remote, Manchester & Biphase encodings
*Auto switching between PCF7936-PCF7961 windows if invalid type detected.
*Autodetect manchester / biphase
Temic transponders:
Temic 11 reading , writing to T5
Temic 12 reading , writing to T5
Megamos transponders:
Megamos (13) reading , writing to T5 , emulating on PCF7930-35
Megamos (48) reading, writing, PIN, unlock by PIN, full range of memory contents, crypto calculation
Megamos CRYPTO-2 (8E) read ID, read/write EEPROM, write Cryptokey
Texas transponders:
Tiris (4C) reading
Tiris (4D) DST crypto reading, writing, crypto calculator
Tiris (4E) DST crypto reading, writing, crypto calculator
Tiris (8C) reading
Atmel:
TK5551M (T5 replacement)
SAAB reading , writing to T5
The product is in working out stages, therefore the list of the supported transponders will be developed later.
What's the key maker usage?
Key maker usage consists of 4 steps. The 4-th step is additional and depends on a vehicle model.
1. Open an immobilizer dump file.
2. Choose number of the key you wanna create.
3. Place a transponder into the coil and click the WRITE button.
4. In some cases the program will ask you to save a modified immobilizer dump. This dump must to be written into the immobilizer.
The "info" windows display an important information:
1. Original transponder---Informs you about type of the original transponder
2. Allowed transponder---Informs you what type of transponders is suitable for the key maker
3. Data location---The immobilizer memory may be stored in various chips, the description informs you about from where you have to read a dump. Some immobilizers can have various chipsets. In this case the field displays several possible chips. Find one of them inside of the immobilizer and read it.
4. Data size---Each chip has certain memory size, the key maker accepts files with the described size.
5. Data format---This field appears in case of 93CXX eeprom seria.
There are 2 standards of data layout:
1.Intel format and Motorola format or Little Endian and Big Endian respectively.
2.The data layout depends on a chip-programmer that is used for eeprom reading.This field informs you what kind of format is suitable for the key maker.Usually you can see that both formats are suitable. It means that the program can understand any data layout.
Tango Authorization License List
If you need more licnse for Tango key programmer, please feel free to email to sales@obdii365.com
| TANGO hardware |
| TANGO basic software |
| Additional Hardware |
| SLK-01 – Emulator DST 40, P1 94,D4 (Functionality included in base software) |
| SLK-02 – Emulator DST 80, P1 98 (requires activation SLK-02 maker) |
| SLK-03 – Emulator DST AES, P1 88,A8 (requires activation SLK-03 maker) |
| SLK-04 – Emulator DST AES, P1 A9 (requires activation SLK-04 maker) |
| Additional Software |
| HITAG2 Edit NXP-HT2 chip software(nxp79xx) |
| Opel key maker |
| Mercedes cars key maker |
| Mercedes trucks key maker |
| Toyota key maker |
| Honda motorcycles (HITAG2) key maker |
| Chrysler key maker |
| Renault cars key maker |
| Renault trucks keymaker |
| Rover key maker |
| Iveco trucks key maker |
| Ford cars key maker |
| Chevrolet (GMC) key maker |
| Dacia key maker |
| Citroen key maker |
| Fiat key maker |
| Isuzu key maker |
| Oldsmobile key maker |
| Peugeot key maker |
| Ducati key maker |
| Cadillac key maker |
| Gilera & Piaggio (ST10..MCU) key maker |
| Alfa Romeo key maker |
| Lancia key maker |
| Key maker Dodge |
| Key maker Daihatsu |
| Key maker Suzuki |
| Key maker Ferrari |
| Key maker Jeep |
| Key maker Nissan |
| Key maker Volvo |
| Comp.Security viewer |
| Syncro maker Volvo |
| Dump editor BCM2 |
| Reset of Toyota/Lexus/Subaru Smart Keys 40,80,128 bit |
| SLK-02 maker NEW SLK-02 Toyota emulator OBD 80 bit |
| SLK-03 maker NEW SLK-03 Toyota emulator OBD 128 bit |
| SLK-04 maker NEW SLK-04 Toyota emulator OBD 128 bit |
| SLK-05 maker NEW SLK-05 |
| SLK-06 maker NEW SLK-06 |
| Toyota Image Generator Page1 36,56,96,37,57 generate copy G chip |
| Toyota+: OBD Reset European cars based on G-immoboxes Toyota G Reset OBD |
| Toyota Dump Editor – Synchro Engine ECU, Smartkey ECU, ID Code Box, Steering Lock ECU NEW |
| Daihatsu Image Generator G keys NEW |
| BMW Bikes (DST80) maker NEW 4D-DST80 |
| Toyota H (128bit) Image Generator |
| Toyota Image Generator H-Keys: Page 1 39, 59, 5A, 99 NEW |
Tango Update Log:
17 December, 2022
Version 1.127 (hw 1.099)
Version 9.5 TangoPlus for Toyota
TangoPlus For Toyota: Added 4 Smart Box models via OBD
Key maker Suzuki Wagon R 2012-(93C86,HITAG)
Added version of Ford Focus 9S12HZ256, DST40
Added Volvo synchro tool rare version of 95P08 in ECU
Fixed some bugs
28 October, 2022
Version 1.125 (hw 1.097)
Version 9.0 TangoPlus for Toyota
Again FIRST in the WORLD! TangoPlus For Toyota: Direct OBD socket connection via J2534 PassThru interface for "Read Immo Data" of all Smart System. System bypasses alarm armed state. Physical access and connection of CAN H & CAN L to Smart ECU is no longer needed.’
Again FIRST in the WORLD! Toyota image generator Page1 20 (TRPWS21,LKP-04)
Again FIRST in the WORLD! Toyota image generator Page1 17 (TRPWS21,LKP-04)
TangoPlus For Toyota: Added over 20 Smart Box models via OBD
TangoPlus For Toyota: Updated Key Learn/Erase for H-Immo
Key maker Alfa Romeo Giulietta 2010- (95640,HITAG)*
Key maker Vespa 300 (95640, Temic11)
Key maker Peugeot 406 2008-(95128,HITAG)
Fixed some bugs
What happens when subscription expires?
When subscription expires your Tango will continue to operate normally. You will retain access to all Base Software, updates and paid functions acquired prior to the subscription model rollout.
SUGGESTION:


We are here for you:
Skype: OBDII365.com
Email: Sales@OBDII365.com
Whatsapp : +86 18150118226
Business Whatsapp: +44 7418605489

Tech Support
Part I: How to Install Tango software?
System Requirements
- OS: Win XP, Vista 32bit; 7, 8, 10, 11 64bit
For XP, Vista & 7 all Microsoft Service Packs and Security Updates have to be installed. - 1GB available storage space
- Internet connection
Setup
1. Download setup file depending on your OS [Win 7, 8, 10 & 11 or Win XP, Vista]
2. Uninstall previous version
If you have never installed Tango software on your PC with a previously released setup file, skip this step.
If Tango software was previously installed on the PC, default path is “C:/ Program Files /Scorpio-LK/Tango” or “C:/ Program Files (x86) /Scorpio-LK/Tango” , uninstall it through the uninstall executable. To find where Tango software resides, right click on the Tango desktop shortcut icon > Properties > Open File Location.
3. Launch InstallOnline.exe (for Windows 7, 8, 10 & 11) or InstallOnlineXP.exe (for Windows XP & Vista) then follow its on screen instructions and prompts.
After main Tango software is installed, you will be prompted to install the required Microsoft Visual C++ libraries, which will initiate its interface. If you have them installed on your PC, chose either Reinstall or Repair option.
Finally the setup will initiate Tango’s USB driver setup. Make sure that Tango hardware is not yet plugged in the PC and press OK. For Windows OS 7, 8, 10 & 11 this will conclude the setup, after which connect Tango hardware and Tango.exe (or its desktop shortcut) can be started.
If you have Windows OS XP, Vista, after driver installation the driver is only pre-installed. To complete driver installation, plug Tango hardware to USB port and wait the standard Windows dialog appears: “Found new device”. Click the dialog and select “Install automatically”
4. Connect Tango to PC
5. Run Tango.exe, an automatic updates procedure will initiate and prompt you to download the latest software version.
Follow the on-screen interface.
Steps 6 & 7 below are automatic. Don't call any interface functions while they are running. Depending on your Internet connection they can take some time.
6. After latest software version is downloaded, Tango.exe will close and relaunch and initiate firmware update.
If it doesn't relaunch with the new software version you haven't installed the required Visual C++ libraries during Step 3
7. After firmware update is complete, Tango.exe will relaunch and prompt update of the built-in hardware timer.
8. Upon timer reset, restart Tango.exe. This is the final step of the setup. To download any auxiliary files select Help->Updates->Check Updates
Part II: Tango Key Programmer Software Installation:
- Download the software files on your desktop.
- Double click on the Tango software installation file (.exe).
- Select language and click Ok.
- Click Next.
- It's recommended to leave the installation path as it is and click Next.
- You can change the name of the shortcut in your start menu. Click Next.
- Check the checkbox Create a desktop icon for easier access and click Next.
- Wait for the installation.
- Deselect Launch Tango and click Finish.
- Go to the folder, where you just installed your Tango Software.(Default : My Computer > Local Disc(C:) > Program Files (x86) > Tango Scorpio-LK).
- Open the Driver folder.
- Choose your operation system type and open the folder.
- Right click on the ftdibus and choose Install.
- Click Ok to finish the driver installation.
- Go to your desktop and right click on the Tango software's shortcut.
- Choose Run as administrator.
- When the Software starts click Update on the OnLine Update window to update your Tango Software.
- Click Ok and wait for the update to complete.
- Your Tango programmer is now ready for work!
TangoPlus Software Installation:
Here you can download Tango key programmer TangoPlus software for Toyota smart key programming.
Free Download TangoPlus Toyota v6.5 software
https://mega.nz/#!ug9ggAiI!ubnm7DBLMXZsfJjCza32S5LEHtBXc1mzWwXI1rxt2Fk
How to install TangoPlus Software?
Download TangoPlus software from link above
Paste Tango-Pus-Toyota-v6.5. zip file on desktop
Extract software zip file
You will get Tango+Toyota.exe and toyota+ .chm files
Right click Tango software on desktop and select Properties->Open File Location
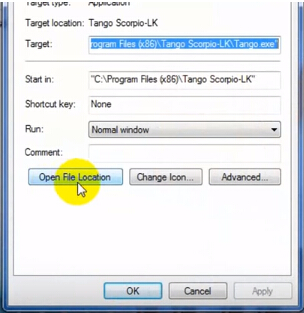
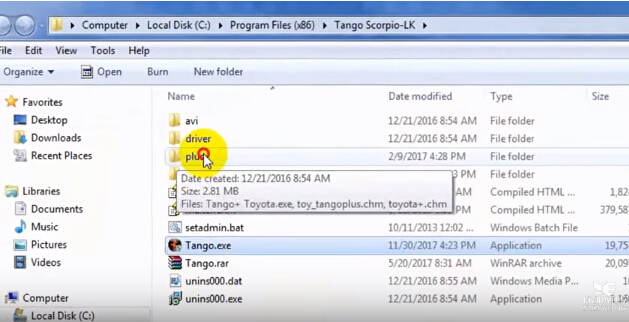
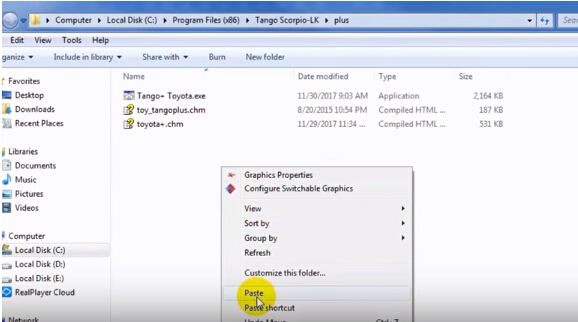
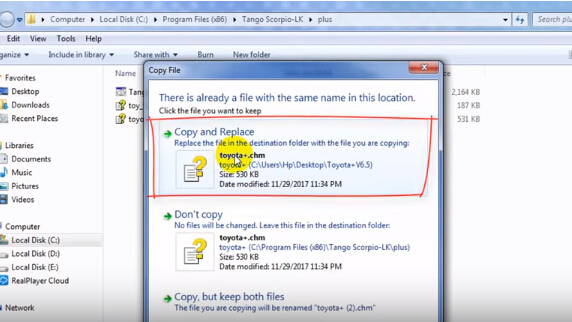
Paste and replace Tango+Toyota.exe and toyota+ .chm files on C://Program Files (x86)/Tango Scorpio-LK/Plus
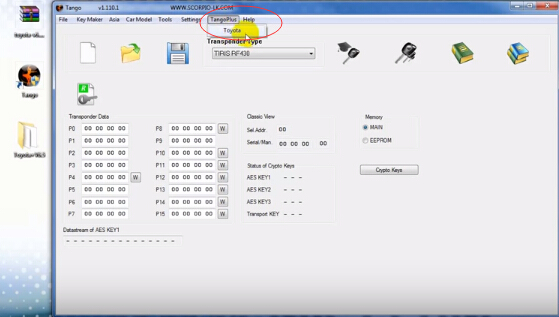
Open Tango transponder programmer software on desktop
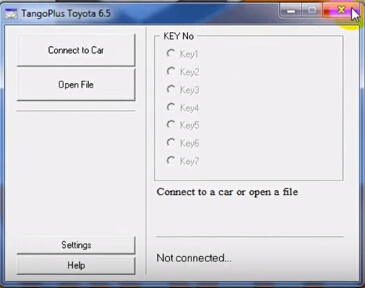
Now you will see TangoPlus function
Done.
Reference:
![[FREE EXPRESS SHIPPING] Original Scorpio-LK Tango Key Programmer with Basic Software V1.127 Supports Daihatsu G Chip /Toyota H 128 Bit Copy Function](/upload/pro-md/20073115962013028767.jpg)
![[FREE EXPRESS SHIPPING] Original Scorpio-LK Tango Key Programmer with Basic Software V1.127 Supports Daihatsu G Chip /Toyota H 128 Bit Copy Function](/upload/pro-md/20073115962015698730.jpg)
![[FREE EXPRESS SHIPPING] Original Scorpio-LK Tango Key Programmer with Basic Software V1.127 Supports Daihatsu G Chip /Toyota H 128 Bit Copy Function](/upload/pro-md/20073115962013013258.jpg)
![[FREE EXPRESS SHIPPING] Original Scorpio-LK Tango Key Programmer with Basic Software V1.127 Supports Daihatsu G Chip /Toyota H 128 Bit Copy Function](/upload/pro-md/20073115962013037059.jpg)
![[FREE EXPRESS SHIPPING] Original Scorpio-LK Tango Key Programmer with Basic Software V1.127 Supports Daihatsu G Chip /Toyota H 128 Bit Copy Function](/upload/pro-md/20073115962013046895.jpg)
![[FREE EXPRESS SHIPPING] Original Scorpio-LK Tango Key Programmer with Basic Software V1.127 Supports Daihatsu G Chip /Toyota H 128 Bit Copy Function](/upload/pro-md/20073115962013045672.jpg)
![[FREE EXPRESS SHIPPING] Original Scorpio-LK Tango Key Programmer with Basic Software V1.127 Supports Daihatsu G Chip /Toyota H 128 Bit Copy Function](/upload/pro-md/20073115962013057964.jpg)
![[FREE EXPRESS SHIPPING] Original Scorpio-LK Tango Key Programmer with Basic Software V1.127 Supports Daihatsu G Chip /Toyota H 128 Bit Copy Function](/upload/pro-md/20073115962013002212.jpg)


